
はじめに
アプリケーション開発において、ユーザーエクスペリエンスとデータセキュリティは不可欠な要素です。特に、利用するユーザープールごとにセキュアにアクセス制限をかける必要がある場合も多いでしょう。筆者自身もこの点がAWS Amplifyに関心を持ったきっかけになりました。今回の記事では、フロントエンド言語のVue.jsと、AWSのサービスであるAWS Amplify、AWS AppSync、GraphQL、そしてAmazon Cognitoを組み合わせ、ユーザープールごとにバックエンドから安全にアクセス制限をかける方法をデモ形式で説明します。
目次
AWS Amplify とは
AWSが提供する包括的な開発プラットフォームで、ウェブやモバイルアプリケーションの構築を簡素化します。認証、API、ストレージ、アナリティクス、リアルタイム機能、ホスティング、CI/CDなど、様々な開発タスクに対するツールとサービスを提供し、バックエンドの複雑さに悩むことなく、優れたユーザーエクスペリエンスを重視でき、他のAWSサービスとシームレスに統合し、モダンなアプリケーションの迅速な開発、展開、管理を実現できます。
AWS Amplify、AWS AppSync、GraphQLとAmazon Cognitoの連携
AWS Amplify(以降、Amplify)はAmazon Cognito(以降、Cognito)と連携し、Cognitoユーザープールのセットアップをシンプルにし、ユーザー認証と認可を簡単に行えるようにサポートします。また、Cognitoの牢な認証とアクセス制御を提供するために、ユーザープールグループを利用することもできます。
AppSyncはGraphQLを利用してAPI開発をスムーズに行うことができます。GraphQLはREST APIの複数のエンドポイントを一つの柔軟なエンドポイントで置き換え、必要なデータだけを取得するアプローチを提供します。クライアントとサーバー間では、GraphQLのスキーマが定義され、ここでクライアントがバックエンドで行える操作の型が定義されます。このスキーマにCognitoに関連する属性を定義することで、データごとにアクセス権限を制御できます。
Amplify、AWS AppSync(以降、AppSync)、GraphQL、そしてCognitoの連携は、効率的な開発とデータ対話を融合させるものです。この統合により、開発者は、安全で効率的なモダンなアプリケーションを作ることができます。
構成と説明
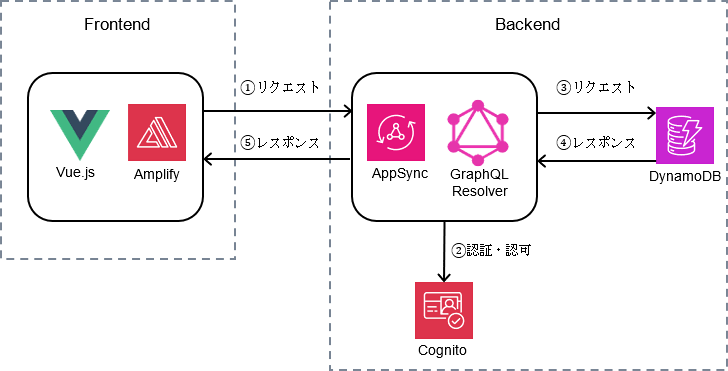
試してみた構成は以下になります。
Vue.js + Amplifyで作ったFrontend クライアントアプリはAppSyncのGraphQL Resolverを利用し、Amazon DynamoDB(以降、DynamoDB)にあるデータをリクエストします。クエストの送信者やグループの権限に基づきCognitoで認証認可を行い、適切なレスポンスが返されます。
デモの実施
前提条件
以下1-3ステップが完了済みの前提です。
- 1.
Vue プロジェクトの作成(vue.js 3)
- 2.
必要な権限を持ったIAMクレデンシャルでAmplify環境を作成
- 3.
認証処理を追加(Emailで認証)
Cognitoユーザープールグループ作成
1. [amplify update auth]コマンドでmasterとcrew の2つのCognitoユーザープールグループを作成します。
amplify update auth
Please note that certain attributes may not be overwritten if you choose to use defaults settings.
Using service: Cognito, provided by: awscloudformation
 What do you want to do? Create or update Cognito user pool groups
#masterユーザープールグループの作成
? Provide a name for your user pool group: master
? Do you want to add another User Pool Group Yes
#crewユーザープールグループの作成
? Provide a name for your user pool group: crew
? Do you want to add another User Pool Group No
#ユーザープールグループの優先順を決める
√ Sort the user pool groups in order of preference · master, crew
✅ Successfully updated auth resource groupauthappe5886c81 locally
2. バックエンドに[amplify push]コマンドでプッシュをします。
amplify push
√ Successfully pulled backend environment dev from the cloud.

    Current Environment: dev

┌──────────┬──────────────────────┬───────────┬───────────────────┐
│ Category │ Resource name        │ Operation │ Provider plugin   │
├──────────┼──────────────────────┼───────────┼───────────────────┤
│ Auth     │ userPoolGroups       │ Create    │ awscloudformation │
├──────────┼──────────────────────┼───────────┼───────────────────┤
│ Auth     │ groupauthappe5886c81 │ Update    │ awscloudformation │
└──────────┴──────────────────────┴───────────┴───────────────────┘
#userpoolはUpdateとuserPoolGroupsはCreate状態になっていることが分かります。
√ Are you sure you want to continue? (Y/n) · yes

Deployment completed.
Deployed root stack groupauthapp [ ======================================== ] 3/3
        amplify-groupauthapp-dev-1615... AWS::CloudFormation::Stack     UPDATE_COMPLETE                Thu Aug 24 2023 16:49:09...
        authgroupauthappe5886c81       AWS::CloudFormation::Stack     UPDATE_COMPLETE                Thu Aug 24 2023 16:48:19...
        authuserPoolGroups             AWS::CloudFormation::Stack     CREATE_COMPLETE                Thu Aug 24 2023 16:48:55...
Deployed auth groupauthappe5886c81 [ ======================================== ] 6/6
        IdentityPoolRoleMap            AWS::Cognito::IdentityPoolRol... UPDATE_IN_PROGRESS             Thu Aug 24 2023 16:48:13...
Deployed auth userPoolGroups [ ======================================== ] 4/4
        masterGroupRole                AWS::IAM::Role                 CREATE_COMPLETE                Thu Aug 24 2023 16:48:40...
        crewGroupRole                  AWS::IAM::Role                 CREATE_COMPLETE                Thu Aug 24 2023 16:48:41...
        masterGroup                    AWS::Cognito::UserPoolGroup    CREATE_COMPLETE                Thu Aug 24 2023 16:48:43...
        crewGroup                      AWS::Cognito::UserPoolGroup    CREATE_COMPLETE                Thu Aug 24 2023 16:48:43...

Deployment state saved successfully.
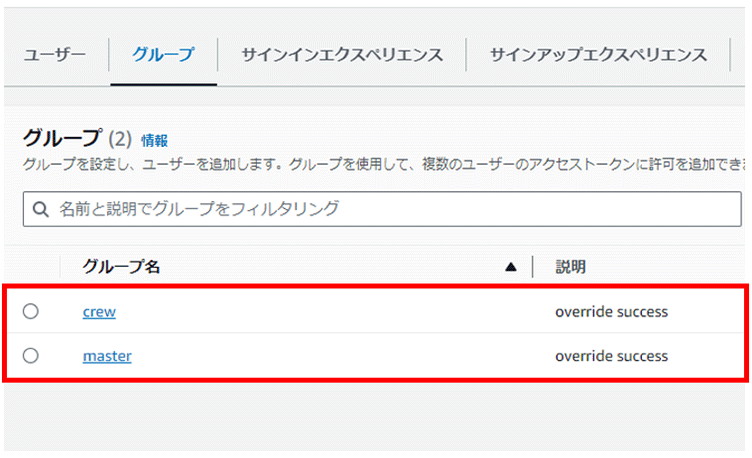
3. その後、Cognitoコンソールにて以下図のようにグループが作成されたことが確認できます。
GraphQL API作成
1. GraphQL API を作成します。[amplify add api] コマンドを実行し、認可タイプをAmazon Cognito User Poolにしてください。
amplify add api
? Select from one of the below mentioned services: GraphQL
? Here is the GraphQL API that we will create. Select a setting to edit or continue Authorization modes: API key (default, expiration time: 7 days from now)
? Choose the default authorization type for the API Amazon Cognito User Pool
Use a Cognito user pool configured as a part of this project.
? Configure additional auth types? No
? Here is the GraphQL API that we will create. Select a setting to edit or continue Continue
? Choose a schema template: Single object with fields (e.g., "Todo" with ID, name, description)

⚠️  WARNING: Some types do not have authorization rules configured. That means all create, read, update, and delete operations are denied on these types:
         - Todo
Learn more about "@auth" authorization rules here: https://docs.amplify.aws/cli/graphql/authorization-rules
✅ GraphQL schema compiled successfully.
2. 以下のSchemaファイルが作成されるので、中身を編集します。
/amplify/backend/api/groupauthapp/schema.graphql
ここでは「Task」というデータベースを作成します。
allow: groupsは、グループに入ったユーザーのみにデータアクセス許可を与える意味です。
masterグループに入ったユーザーは、CRUD(create、read、update、delete)すべてのリクエストができるようになり、crewグループに入ったユーザーに対しては、readだけをリクエストできます。
type Task @model @auth(
    rules: [
      { allow: groups,groups: ["master"],operations: [create, read, update, delete] },
      { allow: groups,groups: ["crew"],operations: [read] }
    ]
  ) {
  id: ID!
  taskName: String!
3. バックエンドに[amplify push]コマンドでプッシュをします。
amplify push
| Fetching updates to backend environment: dev from the cloud.✅ GraphQL schema compiled successfully.

Edit your schema at ***\group-auth-app\amplify\backend\api\groupauthapp\schema.graphql or place .graphql files in a directory at ***\group-auth-app\amplify\backend\api\groupauthapp\schema
√ Successfully pulled backend environment dev from the cloud.
/ Building resource api/groupauthapp✅ GraphQL schema compiled successfully.

Edit your schema at ***\group-auth-app\amplify\backend\api\groupauthapp\schema.graphql or place .graphql files in a directory at ***\group-auth-app\amplify\backend\api\groupauthapp\schema

    Current Environment: dev

┌──────────┬──────────────────────┬───────────┬───────────────────┐
│ Category │ Resource name        │ Operation │ Provider plugin   │
├──────────┼──────────────────────┼───────────┼───────────────────┤
│ Api      │ groupauthapp         │ Create    │ awscloudformation │
├──────────┼──────────────────────┼───────────┼───────────────────┤
│ Auth     │ groupauthappe5886c81 │ No Change │ awscloudformation │
├──────────┼──────────────────────┼───────────┼───────────────────┤
│ Auth     │ userPoolGroups       │ No Change │ awscloudformation │
└──────────┴──────────────────────┴───────────┴───────────────────┘
#Api CategoryがCreate状態になっていることが分かります。
√ Are you sure you want to continue? (Y/n) · yes

⚠️  WARNING: Global Sandbox Mode has been enabled, which requires a valid API key. If
you'd like to disable, remove "input AMPLIFY { globalAuthRule: AuthRule = { allow: public } }"
from your GraphQL schema and run 'amplify push' again. If you'd like to proceed with
sandbox mode disabled, do not create an API Key.

√ Would you like to create an API Key? (y/N) · no
✅ GraphQL schema compiled successfully.

Edit your schema at ***\group-auth-app\amplify\backend\api\groupauthapp\schema.graphql or place .graphql files in a directory at ***\group-auth-app\amplify\backend\api\groupauthapp\schema
/ Building resource api/groupauthapp✅ GraphQL schema compiled successfully.

Edit your schema at ***\group-auth-app\amplify\backend\api\groupauthapp\schema.graphql or place .graphql files in a directory at ***\group-auth-app\amplify\backend\api\groupauthapp\schema
? Do you want to generate code for your newly created GraphQL API Yes
? Choose the code generation language target javascript
? Enter the file name pattern of graphql queries, mutations and subscriptions src\graphql\**\*.js
? Do you want to generate/update all possible GraphQL operations - queries, mutations and subscriptions Yes
? Enter maximum statement depth [increase from default if your schema is deeply nested] 2

Deployment completed.
ここまでの作業で、CLIでのリソース作成が完了しました。次にフロントエンドのソースコードを編集します。
ソースコード
/public/index.html
<!DOCTYPE html>
<html lang="">
<head>
<meta charset="utf-8">
<meta http-equiv="X-UA-Compatible" content="IE=edge">
<meta name="viewport" content="width=device-width,initial-scale=1.0">
<link rel="icon" href="<%= BASE_URL %>favicon.ico">
<script src="https://cdn.jsdelivr.net/npm/bootstrap@4.1.3/dist/js/bootstrap.min.js" integrity="sha384-ChfqqxuZUCnJSK3+MXmPNIyE6ZbWh2IMqE241rYiqJxyMiZ6OW/JmZQ5stwEULTy" crossorigin="anonymous"></script>
<link rel="stylesheet" href="https://cdn.jsdelivr.net/npm/bootstrap@4.1.3/dist/css/bootstrap.min.css" integrity="sha384-MCw98/SFnGE8fJT3GXwEOngsV7Zt27NXFoaoApmYm81iuXoPkFOJwJ8ERdknLPMO" crossorigin="anonymous">
<title><%= htmlWebpackPlugin.options.title %></title>
</head>
<body>
<noscript>
<strong>We're sorry but <%= htmlWebpackPlugin.options.title %> doesn't work properly without JavaScript enabled. Please enable it to continue.</strong>
</noscript>
<div id="app"></div>
<!-- built files will be auto injected -->
</body>
</html>
/src/main.js
import { createApp } from "vue";
import App from "./App.vue";
import router from "./router";

import "@aws-amplify/ui-vue/styles.css";
import Amplify from '@aws-amplify/core';
import awsconfig from "./aws-exports";
// 日本語のimport
import { I18n } from 'aws-amplify';
import { translations } from '@aws-amplify/ui-vue';
I18n.putVocabularies(translations);
I18n.setLanguage('ja');

Amplify.configure(awsconfig);

const app = createApp(App);
/src/App.vue
/views/HomeView.vue
Loading...
タスク名
アクション
{{ task.taskName }}
動作確認
1. masterグループをテストします。
まずは、[npm run serve]コマンドでアプリを起動し、ユーザーアカウントを作成します。
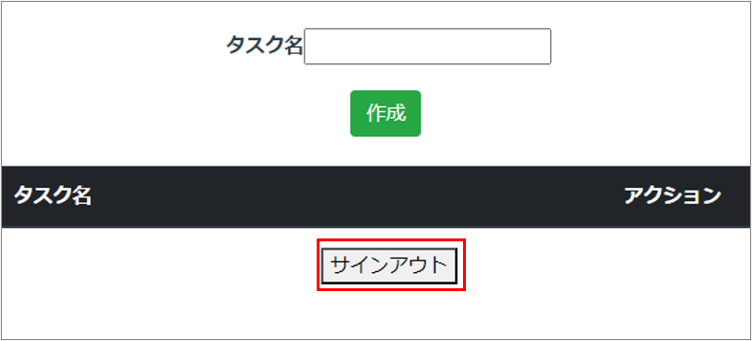
- ※ 新規作成されたユーザーはまだユーザーグループに所属していないため、Webアプリにアクセスできず、以下のエラーが出ます。

その場合、右上の×マークをクリックしてエラー表示を閉じ、サインアウトをしてから次のステップに進んでください。
2. 次に、Cognitoコンソールにて、作成したユーザーをmasterグループに追加します。
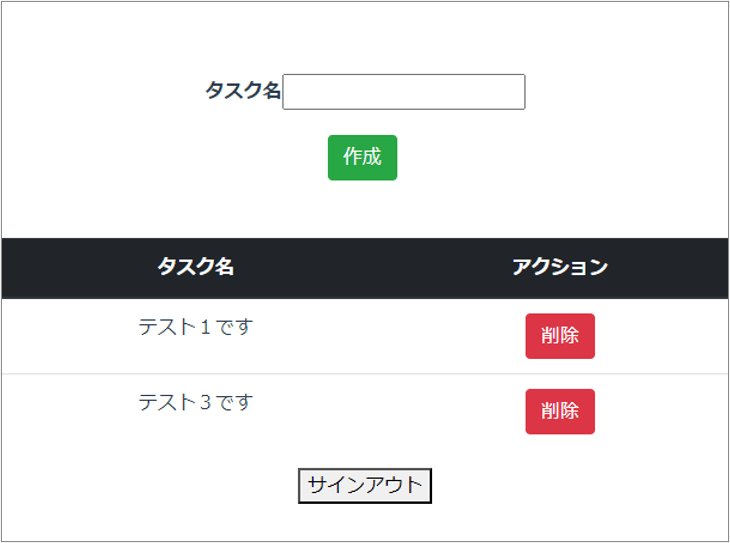
アプリの画面に戻り、再度ログインして、タスクの作成や削除を試してみてください。
すると、問題なく操作ができることがわかります。
「データを入力し、作成または削除を試してみます。」
3. crewグループをテストします。
Cognitoコンソールにて、ユーザーをmasterグループから削除し、crewグループに追加します。
アプリの画面に戻し、再度ログインして、タスクの作成や削除を試してみてください。
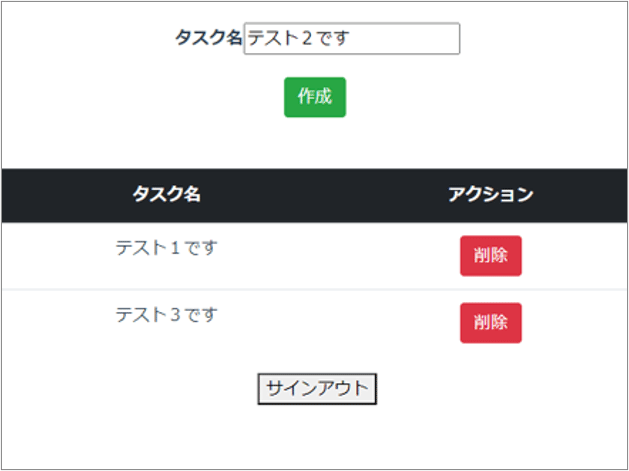
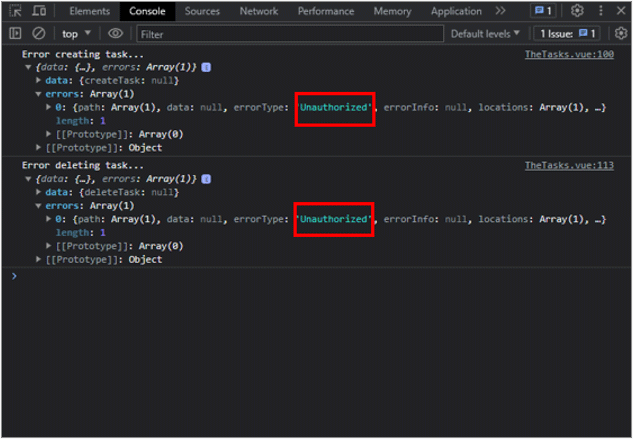
すると、一覧だけを見ることができ、作成や削除処理は許可されていない為、Unauthorizedエラーが発生し、処理が失敗します。
データを入力し、作成または削除をしてみると、以下図のように、何も反応がないことが分かります。
開発ツールのコンソールにて、Unauthorizedエラーの確認ができます。
まとめ
Amplifyを使用して、Cognitoユーザープールグループごとにアクセス権限を制御できるVue.jsアプリを作成しました。異なるアクセス権限を持つグループごとにユーザーを追加しながら、動作確認を行いました。このような認証認可処理を、Amplifyを用いて簡単に実装でき、開発がスムーズに行えることが分かりました。
動作確認に関しては、今回はWebアプリ画面を操作してご紹介しましたが、フロントエンドのコードに手を加えることなく、API確認のみを行いたい場合は、AppSyncのクエリエディタを使用して確認することもできます。
最後に、本記事で記載した手順や内容はデモ用のものであるため、ご参考程度に留めておいてください。簡単なご紹介となりましたが、Amplifyやサーバレス開発にご興味のある方はぜひ当社までご相談 ください。
参考文献
Amplify Setup authorization rules
作者プロフィール
| 名前 | AUNG |
| 担当のAWS業務 | 営業支援、ソリューションアーキテクト |
| AWSの持っている資格 | AWS Certified Developer - Associate AWS Certified Solutions Architect - Associate AWS Certified DevOps Engineer - Professional AWS Certified Solutions Architect - Professional AWS Certified Data Analytics - Specialty AWS Certified Security - Specialty AWS Certified Advanced Networking - Specialty |
| 好きなAWSのサービス | Amplify、CloudFormation |
| 趣味 | 筋トレ |
| ひとこと | 健康は大事 |

(寄稿:THU YEIN AUNG / 監修:高谷 英雄)
関連サービス
おすすめ記事
-
2024.03.26
サーバーレス活用例|iPhoneとiBeaconで自動車通過チェックシステムを作ってみた -AWS LambdaとBLEで作るサーバーレスな通過記録アプリ-

-
2024.02.06
AWS Lambda活用ガイド|活用事例から学ぶAWS Lambdaの特性や注意点
-
2023.12.28
展示物解説アプリをiPhoneとiBeaconで作ってみた -AWS LambdaとBLEで作るサーバーレスな接近検知アプリ-

-
2023.05.23
AWSで実現するサーバーレスとは? 向き不向き、導入の成功ポイントを解説
-
2023.02.27
サーバーレスの時代? AWS Lambdaを活用した、サーバーレスアーキテクチャのシステム開発のすすめ

